
I have to admit my Podcasting Microphone Pet Peeve: The Blue Yeti Mic. Recently I attended a coaching group meetup, and the presenter was a consultant who also considered herself a podcasting expert. And it was put to us in dogmatically certain terms that "The Blue Yeti Podcasting Mic Is Simply The Best Microphone For Podcasters". And in this post it is my solemn duty to disabuse our dear prospects and Yeti fans of this notion.
First of all: There is no such thing as a Blue Yeti Podcasting Mic. It is simply the Blue Yeti Mic. At the coaching meetup I kept my mouth shut, but it was hard. And, this is not the first time I heard this, and we have worked with lots of podcast clients who approach us with initial Blue Yeti podcasting pride.
Microphone Talk
Microphone talk is a favorite topic among podcasters, and mostly beside the point.
Great microphones never guarantee a great podcast.
But the blind devotion that the Blue Yeti seems to inspire among novice podcasters has always been a source of mystery for me. The Blue Yeti may be an excellent microphone, technically speaking. But it is usually the wrong choice for podcasting, for the following reasons:
Why the Blue Yeti Podcasting Microphone Is Often The Wrong Choice For Podcasters:

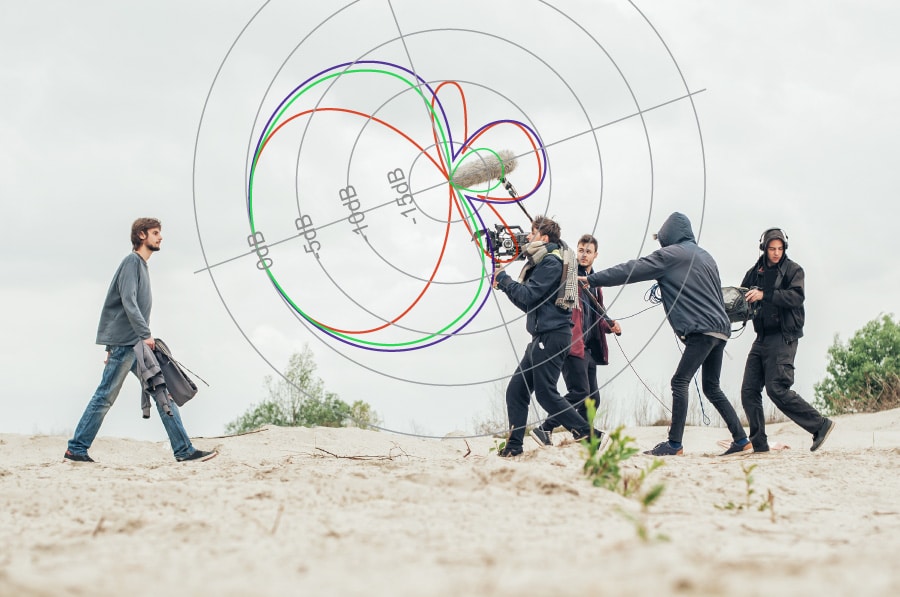
The Blue Yeti is a Condenser Mic
It is a condenser mic, not a dynamic mic. Condenser mics will pick up sounds a mile away, and there are indeed valid concerns around air conditioners running etc.
This also means they pick up the sound of the room.
If you are recording in a kitchen, bathroom or basement, the sound of the room, and the reverberations in it, will be super apparent.
There is no way to remove reverberation once recorded. So for your ghost story podcast the "basement sound" might be ideal. In most other cases, not so much.
‘The Blue Yeti in particular, in spite of its sexy switches and cardioid pattern option, is “roomy” sounding, not what you want for distraction free and intimate sounding audio. Being able to switch the pickup pattern helps a little, not a lot.
A large and unwieldy form factor
The Blue Yeti is heavy, large, and cannot easily be mounted on a boom arm, which is necessary to move it close enough to your mouth as you record.
Most people make the mistake of leaving the Yeti on its stand positioned on their desk, 1-2 feet from their mouth - instead of having it inches away from their mouth.
A desk stand Yeti is never going to sound great, unless you are in a sound isolated booth or purposefully built studio.
The Yeti is an expensive choice, once you buy the shock mount and boom arm and pop filter needed to use it in a “podcasting setup” - in other words close to your mouth. So if you add these pieces, you might as well get a “proper” podcasting mic.
What About The Yeti Pro?
The Yeti Pro is an upgraded (and also much more expensive) version of the Yeti. It improves on the hit original Yeti USB microphone with a stereo balanced XLR output, and professional 192 kHz/24-bit digital audio over its USB out.
The Yeti Pro is indeed an improvement, but still a condenser microphone — which is the fundamental Yeti problem for most podcasting use cases.
So it’s great to be able to connect to a standard XLR preamp, mixer, or audio interface, but the “roomy” sound quality will be there just the same. And mounting it on boom arm stands is still as difficult and unwieldy as with the original.
What about the Yeti Nano?
The Blue Yeti "Nano" Microphone may be "nano," but it's still a pretty large microphone.
In a soundproof studio or a treated room, the Blue Yeti Nano could work for podcasters, but there are likely better condenser microphones available for podcasting.
The Nano is essentially a slightly more compact version of the original, which is a bit of a chuckle in itself. So, if you're looking for a top-quality podcast microphone, it might be worth seeking alternatives in the sea of wonderful podcasting gear.
The Advantages Of Dynamic Mics

- Dynamic mics on the other hand reject much of the background noise and are ideal for podcasting.
- They are also less costly.
- They are easy to mount on a boom arm, a must have for podcasters in getting their mics close enough while also being comfortable.
- Lastly there are options with BOTH XLR professionally grounded cables, as WELL AS USB connectivity.
One last thing: USB connections will seldom be enough for a strong enough recording signal, for either dynamic or condenser mics with built in USB connectivity.
Better sound quality comes from a XLR condenser mic not directly connected to your PC or Mac directly, but going through a small desk USB pre-amp like the Focusrite in the equipment list below. Here is a direct link to what most of our podcast clients use (a budget conscious version, the mic is $79):
Podcast on YouTube Starter Kit — Extended Edition

The Podcast on YouTube Starter Kit - Extended Edition is a comprehensive setup designed for recording and streaming quality video podcasts with YouTube as the primary platform.

It includes the Rode PodMic Cardioid Dynamic Podcasting Microphone, which boasts a built-in pop filter and delivers rich sound quality. Also included are the Audio-Technica AT2005USB Cardioid Dynamic USB/XLR Microphone, the Focusrite Scarlett Solo (3rd Gen) USB Audio Interface, the Dazzne Desk Mount LED Video Light C-Clamp Stand Kit, and the Lume Cube 2.0 Adjustable Daylight Balanced LED Light. To make streaming more seamless, there is an Elgato Stream Deck for controlling various actions, and for video, the kit has a Logitech BRIO Ultra HD Webcam.
Determined to use the Yeti?
So I am sorry if some of the above is unwelcome news.
And if you are committed to using a Blue Yeti, feel free to ignore this advice and read on for some tips to at least get the most out of it.
I do not know why the Blue Yeti inspires such devotion among some people. I have yet to meet a podcaster with more than 10 episodes under their belt that still has it. But for podcasters that inherited the device , or are not able to spend money on a new mic, here are some tips to make the Blue Yeti work better:
Tips to Make The Blue Yeti Work For Podcasting

1. Work in a sound-proof studio or sound treated room
If you have a sound proof, purposefully built studio to record in, ignore this post, your Blue Yeti will work fine.
- Then again, if you have a purposefully built studio, you are extremely unlikely to own (or want to use) a Blue Yeti in the first place.
2. Record inside or in front of a closet
If you have a small closet, are not claustrophobic and comfortable in small spaces, your Yeti will work.
Actually, I’m serious about working in (or near) a closet. But here is the thing:
- You should not be facing the closet, you should actually have it close behind you. This is because when you speak into a mic it will pick up your voice and noises and sound from what’s BEHIND you - so that is where room reflections and reverb are most noticeable. Therefore having a closet (or sound proofing materials) BEHIND you works better than facing a closet head on.
3. Add carpets
Add some carpets to your recording space to reduce the room sound the Blue Yeti will pick up
- If you have lots of furniture and carpets in the room, and few reflective surfaces, and can position yourself close to the mic, your Yeti might just work.
4. Get closer
I mean REALLY close to the microphone.
- Your Yeti recording might result in something called the “proximity effect” - where your voice is being picked up much more loudly than the “room sound” - and all this allows you to reduce the gain during the recording. Try it out and see if you can hear the improvement.
- Getting really close might also cause more “pops”, so addressing the mic from a slight angle or using a pop filter might help with that.
But be sure to do a test recording and listen to it - before recording that epic 1st one hour episode.
End of rant.
PS. Interested in podcasting tech, and podcasting content strategy, consider joining our Podcasting strategy insights newsletter at insights.polymash.com
